The Zone System
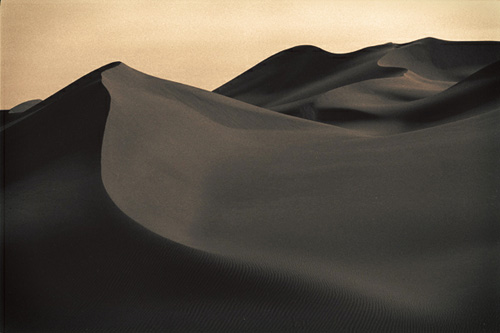
A photo of Chinese dunes makes me recall a word "Zone System"
The Zone System is the theory which was proposed by the father of American
photography, Ansel Adams. I learned it early stage of photography class,
I remember.
Photograph is an art of light and shadow. Even though a fast camera is invented, complete darkness will be solid black, and the lightness will be solid white forever. It's a universal theory.
Photograph records the light between the solid black and white. Ansel Adams
divided it into 11 zone scales, from 0 to X(10), by the light value. The
middle is V(5), Neutral gray (18% reluctance gray). Adams closely watched
landscape before photographing with a large format sheet film and classified
the tone of each detail in appropriate zones. For instance, white cloud
and snow in the sun were placed in the zone IX(9), bright leaves in the
sun and light colored rocks were in the VII(7), North sky on sunny day
and slightly tanned skin were in the V(5), tree shade and dark soil were
in the III(3), black gray but had detail was in the I(1). The zone 0 and
X(10) were solid black and white.
Then he decided the appropriate shutter speed and aperture to get a maximum
information between the zone I and IX, on the film. Eventually he left
beautiful prints which described great American nature like landscape of
Yosemite valleys or New Mexico. The reason why he is called 'Father of
American photography'
So the zone system is out of fashioned and complicated theory in B&W
film era. No. I wrote 'Photograph is an art of lightness and shadow' at
the beginning. On the contrary, if you understand the theory, your photo
expression will be stepped up. Please replace the word 'gray tone' to 'lightness'
for the color photo.
The range between zone 1 (tone almost blocked up) and zone 9 (tone almost
blown out) is generally called Dynamic Range. A recordable range of tone.
The widths of the range, unfortunately, depends on camera's spec. So let's
change the point of view to the zone 5 (mid tone)
If you have a digital camera which can set the shutter speed and aperture
manually, and spot metering the exposure, take 'em out. Doesn't matter
whether it's a smart phone camera or the lens fixed compact. The ISO should
be fixed, ISO200 for example.
I'll pick up an daily snap and portrait as example here instead of the
great landscape of Ansel Adams. The meter which is shown in the finder
( LCD) is an exposure meter. The scale in the middle is +-0 (mid tone).
Generally ,The meter has 2 bold scales to the right (Up) for lighter direction
and another 2 bold scales to the left for the darker. Let's say the meter
is a compressed zones (from 1 to 9 in exact) on your camera image. The
outer area of the scales means the area which has possibility of blocking
up or blown out in the resulted picture.
Target the object with the center of the frame and measure the exposure
(the meter is automatically turned on with camera) If you take a shutter
when the meter indicate middle, the object will be photographed in exact
mid tone as the result. Generally Asian skin tone is close to the mid tone.
So if you photograph my face with the meter reading, an image on the photo
will be in almost same tone as the face you've actually seen.
However, it's a little bit complicated but important. In real world skin
tone is various, light skin of Caucasoid, dark skin of African and Asian's
skin tone is middle of them. Although if you photograph those skins with
the middle scale reading, they will be expressed in the same mid tone.
It means the African skin is expressed lighter than the real, darker for
the Caucasoid. Talking from different point of view, if you wanna get a
same tone to the real, read the scale -1 (dark gray) for the skin tone
of African. The neutral gray is absolute in the real world, meanwhile in
the photography the neutral gray is relative.
It's important to decide an exposure of main subject when you photograph
snap or portrait. Think about the middle (Zone 5) of 11 zones in priority.
When you aim the background, you can measure the exposure too. You can
easily predict how it will be shown in final result from the metering.
The light value of the background is in far outside of the scale ? It will
blocked up or washed out? Forget about the back ground at this point. The
way for lighting up the main subject with flash or reflector for filling
the gap between foreground and background, I'll mention it some other time.
All the things I have written so far is covered by Auto Exposure Mode of
your camera. The camera itself chooses the appropriate combination of shutter
speed and aperture automatically. However the camera doesn't know which
is your main subject in the picture. The camera doesn't know which tone
you want neither. The camera cannot read the photographer's mind. As long
as you use the auto mode, you cannot get a result which is perfectly fit
to your image. I have not use the auto mode for almost 30 years. Always
manual mode. Set shutter speed ... then aperture ... takes a too much time?
No it's a second if you are accustomed to do it.
A fun of photograph must be the creativity. Picture the result in your
mind when you shoot. Of course, a professional photographer does. Cannot
make living without it. In the film era, the time waiting for developing
film felt forever. Thanks for the digital era. We can check the image right
after the shooting, or even in real time. In case of NG, it's quicker with
manual mode to recovery.
My work of dune was taken by B&W film. Of course, I pictured the final
image when I photographed it.
Change the hit or miss style to the more logical one. Academic approach
to the Photography is sometimes quite important. In another words, as long
as you depend on the automatic technology without the academic knowledge,
you cannot leave from the hit and miss style forever.
Dec. 2016
Today's piece
" Dunes " Xinjang, China 2006 |